12.20.2011

LAX TO YVR SHOP WINTER SALE


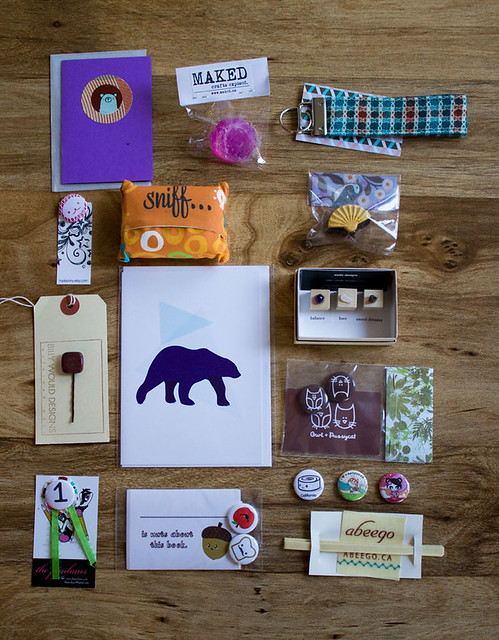
I opened LAX TO YVR in June, and it's been so encouraging to watch it grow over the months. It makes me happy that customers have responded positively to my products. To celebrate, everything in the shop (except for gift certificates) will be 20% off (before shipping). Just use coupon code WINTER at check out.

Also, I'm just six sales away from reaching 100! Having almost 100 sales is more than I expected given that LAX TO YVR has been in business for only six months.


I'm looking forward to what 2012 will bring. There are some new products in the works that I will start rolling out come January, so stay tuned! If you'd like to stay up to date in regards to new products, special offers, and discount coupons, then sign up for the newsletter to be first in the know.

Also, in case you didn't know, gift certificates to the LAX TO YVR shop are available if you're looking for a last minute gift.

Lastly, I'll be taking a break from blogging for a couple weeks. I've been experiencing excruciating pain in my arms lately due to computer use. My right arm is especially useless due to mousing so much. Hopefully, I'll figure out a more ergonomic set up for my keyboard and mouse so I can work properly without killing my arms. Until then, enjoy the holidays!

12.16.2011

OUR FABULOUS NEW VINTAGE ARMCHAIRS


Our latest furniture acquisition has been a pair of vintage armchairs. If you follow me on Twitter, you may remember how I was agonizing over whether to get them or not. We're in the midst of apartment hunting so it seems kind of impractical to get new furniture, especially when you don't know what your future space is going to look like.

But I saw these chairs when we visited Attic Treasures on Commercial Drive - a great resource for midcentury modern furniture and other vintage goodness, by the way - and they just really tugged at my heart. I wasn't even in the market for new armchairs since I already got one a few months ago. It's always when you're not looking for something in particular that you find that piece you know is perfect for your home. I simply fell in love with these chairs and I wanted them badly. But I didn't purchase them right then and there. I gave myself a week to think about it, and when I decided that I really did want them, I hoped and prayed they'd still be there. And they were! Hallejulah! 


What I love about the chairs are the tufted cushions, the strong 70s vibe, and the manly chrome frame, which also lend them an airy look. Most of all, they're just full of character. They actually remind me of E.T. for some reason; perhaps because they're short, squat, and brown. The armchairs now occupy the space where the ugly and very uncomfortable loveseat used to be.

I'm an advocate for buying used as much as possible when it comes to home furnishings. It's just a sound and sustainable way of decorating your place. That's why I'm an avid vintage home decor collector. I love looking around our place and seeing all the unique pieces I've accumulated over the last few years by scouring thrift shops, vintage shops, Craigslist, and estate sales. Hence, adding yet another piece of vintage furniture to our home feels like winning to me.

12.14.2011

DIY HOLIDAY CARDS


This holiday season I got the urge to make my own cards. I used materials I had lying around and whipped up these cards in no time - a fast, instant gratification project.

Materials:
- Various felt fabric
- Yarn scraps
- Ribbon
- Blank cards
- Cardstock paper
- Glue

Tools:
- Fabric scissors
- Pen

Ornament Card

1. Draw ornaments shapes on cardstock paper with a pen. Cut out the shapes. Then place an ornament shape on a piece of felt fabric and trace around it with a pen. Cut the shape, preferably with fabric scissors for a clean, crisp edge.


2. Spread glue lightly on back of ornament shape and paste it on the front of a blank card.

3. Pour a thin line of glue from top centre of the ornament to the top of the card. Glue a piece of scrap yarn on it. Then cut off the excess at the top.


4. Make a little ribbon with a piece of scrap yarn. Then glue it at the top centre of ornament.


Christmas Tree Card

1. Cut a triangle from a piece of green felt fabric.

2. Cut three ribbon scraps and glue them on the diagonal on the tree. Allow to dry for 30 minutes. Then cut off the excess.


3. Cut out a little tree stump from a piece of felt fabric.

4. Spread glue lightly on the backs of the triangle and stump and glue on the front of a blank card.


Trio of Pennants Card

1. Cut out a rectangular strip  of felt fabric. Fold lengthwise. Draw a diagonal line from the point where the corners meet to a point on the folded edge about 1 cm in from the adjacent edge. Cut along the line. Repeat this step two times with other pieces of felt fabric.


2. Lightly spread glue on backs of pennants. And paste on the front of a blank card.


If you don't have felt fabric on hand, coloured paper would work just as well. I used felt because I've got heaps of it (it's one of my favourite materials to work with).

12.08.2011

MY FAVOURITE HOUSE


my favourite house

I am head over heels in love with this house. It's in the Kitsilano area in Vancouver.

It's total eye candy. I love the dark grey paint job (surprise, surprise). In spite of its super modern look, the wood accents really warm it up. I'm dying to see what it looks like inside but I'm too timid to get up close to it and snoop around. Also, I'm curious to know who lives in this house.

my favourite house

Even the Dude likes this house, which goes to show you how much I've corrupted his tastes. He's a country boy from rural New England who grew up surrounded by by old, quaint houses.

We'll never be able to afford a house like this in Vancouver. As long as we live in this city, we'll be renters for life. Speaking of which, we've been busy apartment hunting. We're planning to move at the end of January. Not sure whether we'll be moving to a 1-bedroom or 2-bedroom. It'll probably depend on what we find. I'm very tempted to move into a 2-bedroom, but I'm afraid of accumulating junk to fill the extra space. As a reformed pack-rat, I've come to enjoy living with as little as possible. Even with the weekly purgings, I still feel like we have too much stuff.

12.06.2011

I WON I WON I WON!

If you follow me on Twitter, then you may already know that over the weekend I won a giveaway contest being hosted by Got Craft? Vancouver. My prize was a swag bag full of goodies from Got Craft? vendors. I was so excited that I won because I NEVER win anything. I rarely enter internet giveaways anyway, so this turn of luck came as a huge surprise to me.

I attended the Got Craft? show on Sunday and was blown away by the amazing stuff that people were selling. Seriously, I wanted to buy at least one thing from each vendor. Plus, I got to meet some Vancouverite Etsy sellers that up to this point I only interacted with virtually. It's so awesome that Vancouver has such a vibrant handmade community.

got craft swag bag contest winnings

These are just a portion of my winnings. I picked my favourite ones to show off here.
From top left, clockwise :

 1. Thistle Town Studio
 2. Maked
 3. Banoo
 7. Kukubee
 8. Abeego
Now I got to figure out what I'm going to do with all this stuff. I'm probably going to spread the love and give most of it away. 


12.02.2011

REUPHOLSTERED CHAIRS

This past summer I worked on a dining room chair reupholstery job for my relatives. I love the contrast between the simple clean lines of the fabric and the graceful antique chair. Having contrasts is one of the best ways to liven up a space. If everything is too matchy-matchy and coordinates seamlessly, then the room looks flat and sterile, i.e. booooring.


Upholstering the seat of a dining chair is the easiest type of upholstery that one can DIY. This is my favourite Youtube video on how to re-upholster a chair. There are also a countless number of tutorials out there. I read a few to figure out the best technique.

The obligatory before and after picture.

Dining room chairs

I'm a nut for stripe patterns. If I allowed myself, I'd have striped everything.

We acuired a teak lounge chair back in September. It was on sale at Sugar Barrel Antiques on Main St. so we snatched it up. Unfortunately, the cushions were friggin' ugly, and the fabric was worn through and ripped on parts of the the seat.

teak chair - before

I wasn't confident enough to take on the reupholstery project myself. So I paid someone a lot of money to do it for me. It took almost a month to get them back because they were super busy. Hence the reason why this blog post is long overdue.

vintage teak lounge chair

Unfortunately, I'm not quite happy with the results. It was the first time I ever had anything professionally upholstered so I didn't give specific directions. What I really wanted were boxy cushions, but of course, to my great irritation, the person couldn't simply read my mind. Anyway, I think in the future I may try to reupholster the cushions myself.


teak lounge armchair - after

It's a beautiful chair. I agonized over whether to get it or not. But it was such a good price that I couldn't pass it up. It's only going to go up in value because there's only so much midcentury modern furniture in the world and everyone wants a piece of the action it seems. SBA is a great source of MCM furniture and accessories in Vancouver. All their MCM stuff is in the basement, and I go weak in the knees looking at their vast collection every time I go.

We recently acquired a pair of vintage armchairs (from Attic Treasures on the The Drive), and I can't wait to show them off here. But first we need to get rid of the loveseat (the last piece of ugly furniture we own) before they can take their proper place. Our living room is an unholy mess right now.