Showing posts with label DIY. Show all posts

3.12.2012

CHEESE BOX NIGHTSTANDS


We finally have matching nighstands! This is actually the first time I've had a proper nightstand on my side of the bed. For the last few years I've been either living without one or just had a basket to hold my reading materials. The Dude has had a series of salvaged nightstands we picked up from various places.

So a few weeks ago I bought a pair of vintage round cheese boxes from Stepback for the purpose of using them as nightstands. I really like that they're round, which provides a nice contrast to the big rectangular bed and dresser. We just slapped some castors on them to make them a bit taller, and because I like putting castors on just about any piece of furniture! This was a simple, instant gratification DIY project, and I'm so pleased with the results!


I especially love the seams on the cheese boxes, particularly on the one right above with the numbers stamped along the side of it. Back in the old days these boxes were used to age cheese.

Here's a play-by-play of how we attached the castors onto the cheese box.

Materials and Tools

  • 2 cheese boxes
  • 6 2 in. brass castors
  • 24 bolts (size will depend on your castor)
  • 24 nuts (size will depend on your bolt)
  • 24 washers (size will depend on your bolt)
  • Pencil
  • Power drill


Turn the cheese box upside down and position the three castors to where you want them to be.


Use a pencil to mark where you'll drill the holes.


Use the right sized bit to drill the holes.


Fasten the castors to the cheese box with the bolts. Turn the box over carefully and place the washers over the bolts.


Fasten the nuts to each of the bolts and you're done!


They look old and lovely. It pleases me to no end when we're able to acquire a used piece of furniture (or in this case a used item repurposed as furniture) instead of buying something brand new. One of my decorating mantras is to use preloved furnishings as much as possible because it's better for the environment and, to boot, they provide a lot more character than something that was manufactured recently.

1.24.2012

HANGING PICTURES SALON-STYLE

I've already started mentally decorating the apartment we're going to move into next week. I have to confess that I've been doing it since I first laid eyes on it, before we even knew we were going to move there!

But I've learned that it's wise to live in the space for at least three months before even beginning to decorate it. Ideally, it would be six months, but I don't think I can be that patient! But you really have to get to know a space by living in it for a while and getting a feel for it before deciding what your decor style is going to be. Our new place is so different from our current place that I don't think the same decorating strategy is going to work. So I'm afraid that I'm going to have to throw out my "Southwest modern" look and start from scratch.

One thing I know is that I want the place to feel a bit more cozy. But herein lies the dilemma. "Cozy" usually means clutter, at least in my opinion. I've noticed that cozy spaces usually have a lot of stuff going on. Coziness is typically achieved by creating layers of stuff upon stuff. And the Dude and I are very much against having a lot of "stuff." We're trying to live as lightly as possible so it's going to be a challenge to cozify our new apartment while at the same time maintaining a minimalist lifestyle. I'm aware that you can create cozy by carefully choosing texture, colour, and shape. So one possibitlity is painting the walls a warm colour. Another strategy is by having puffy furniture rather than leggy, airy pieces. Creating a cozy look with as little stuff as possible is going to be an exciting challenge!

So, even though I said that I don't want to start decorating until at least three months after we've moved in, I've already jumped the gun and have decided I want a salon-style wall in the dining nook. This is a great way to cozify a space.

There are several options for doing a salon-style wall (a.k.a. gallery wall) of pictures. You can do it symmetrically or asymmetrically. Symmetrical configurations tend to look more formal. You can also hang pictures from the top of the wall to the bottom or you can just focus on the centre of the wall.

Symmetrical gallery wall:

Gallery Wall at the Shore

Asymmetrical salon-style hanging:


Here's one that takes up the whole wall from floor to ceiling (plus, the black wall makes me weak in the knees):


I love this salon-style wall because it's so clean and un-cluttery looking:


I think it's really hard to pull off a well-curated gallery wall but here are some helpful guidelines:
  • Make the frames all the same colour or choose a common theme/colour for your images. Select either option to tie the whole thing together
  • Keep in mind balance, especially if you're using different sized frames. Distribute the size of the frames evenly. Don't make it "top-heavy" or "bottom-heavy," i.e. avoid grouping similarly sized frames all together.
  • Before nailing the pictures into the wall, trace them first on paper, cut out the paper, and stick them on the wall with tape until you come up with a configuration you like. Then proceed to nail the hangings on to the wall. After, pull out the paper from behind them. 
  • If you're going to arrange the pictures around the midline of the wall, make sure that the center of the whole arrangement is around 57 inches from the floor.

1.19.2012

ARRANGING WALL SHELVES


One important thing I learned about wall shelves is that you want the space between them to decrease as you go up. By the time I got this tip from the second Apartment Therapy book, I had already put up the wall shelves in my office. I had initially spaced the shelves evenly apart; if you look at the "before" photo you can see that the space between the top and middle shelves actually looks bigger than the space between the middle and bottom ones. It's a visual distortion, and that is why it's crucial to arrange the top shelves closer to one another in order to compensate for it. When I realized this, it bugged me to no end. The Dude told me to just accept it and move on. But it seriously ate away at me.

Finally when I repainted the walls last fall, I took the opportunity to lower the top shelf by just an inch. It's amazing how just one inch made all the difference in the world! I could finally look at the wall shelves and be at peace. I mean just look at the "after" photo. The shelves look so much better and evenly spaced out!

Another tip I learned by simply looking at a lot of wall shelves on the internet is that you want to place less items on the shelves as you go up. I noticed that the best stylized wall shelves are the ones that don't even hold anything on the top shelf - they are simply left empty! You want to create a sort of a pyramid effect when arranging things on wall shelves, i.e. going light to heavy from top to bottom. It mimics how things are arranged in nature (e.g. think of cascading waterfalls) and so our eyes find it visually appealing.

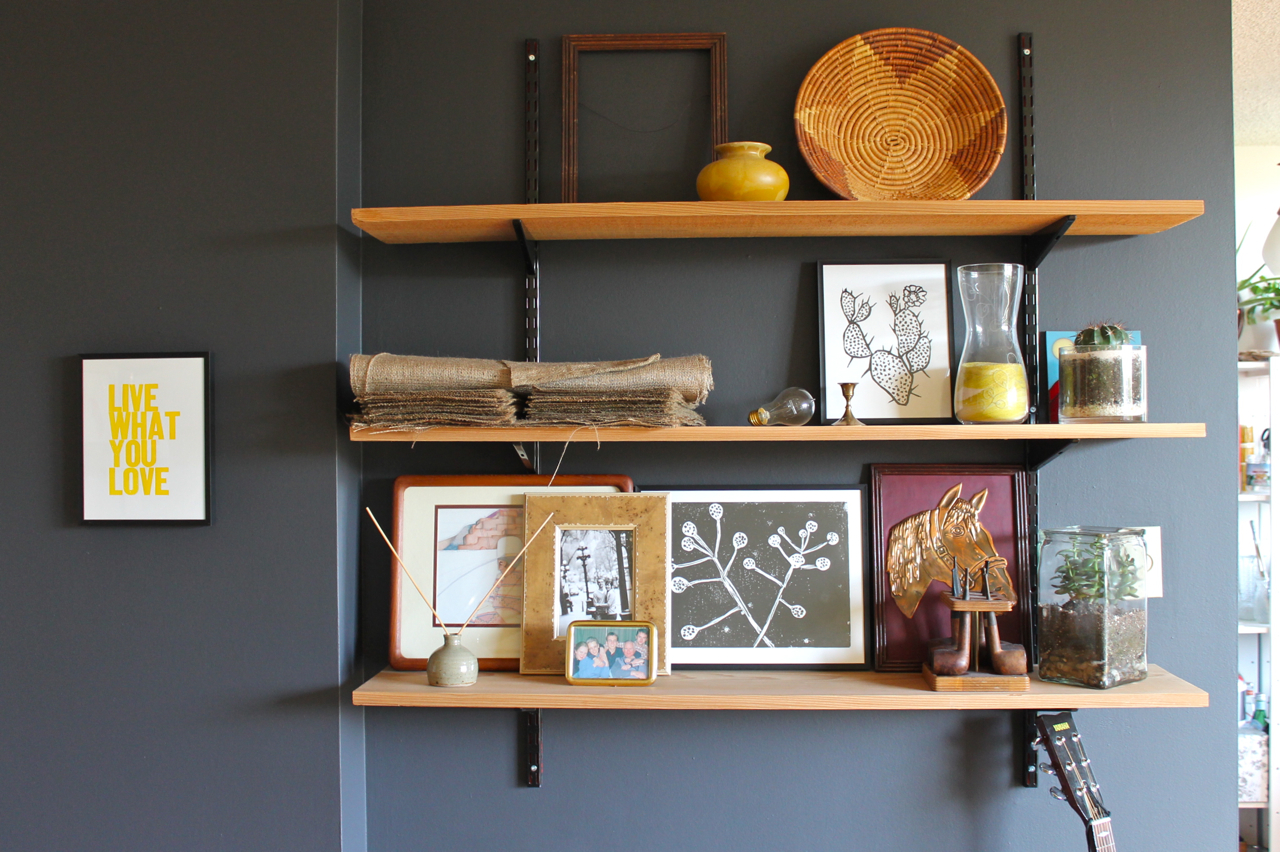
Below is a set of wall shelves in our own apartment. Not the best stylizing job but I tried to mimic a cascading effect.


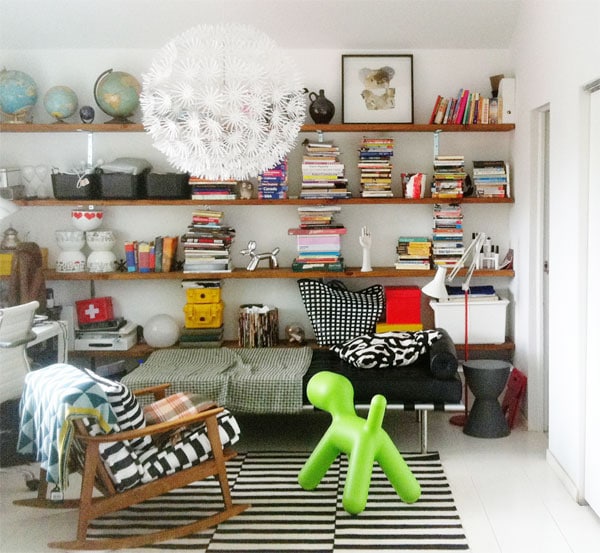
Here are better examples of well arranged wall shelves.


from Freshome


from The Brick House

Of course, rules are meant to be broken. Here's a set of wall shelves I love that disregards everything I just wrote.


from Manhattan Nest

1.12.2012

HOW TO CLEAN STERLING SILVER THE EASY AND FAST WAY


Sterling silver jewelry is my favourite kind to wear. But in the past I avoided buying it because I hated that it tarnished. Because I didn't know how to clean silver well enough to bring it back to its former pristine condition, I would just chuck it aside and never wear it again.

Then I discovered a simple, safe, and effective method for cleaning sterling silver. So now I have no qualms about buying and enjoying silver jewelry. 

Here's a pair of earrings that had tarnished and needed cleaning. See how fast and easy it is to get them looking perfect again using the method described below. 


Supplies:
- Non-metal bowl (glass or plastic works well)
- Piece of aluminum foil big enough to line your bowl
- Baking soda
- Chopstick or any other wooden/plastic utensil


1. Bring to boil enough water to fill about half the bowl.


2. Line the bottom of the pan with the piece of aluminum foil.


3. Place a heaping teaspoon of baking soda on the foil, and fill the bowl with water (about halfway is fine).


5. Drop your jewelry into the bowl, making sure it touches the foil. Water will start to fizz and there will be a slight sulfurous odour. 

6. Leave the jewelry in for about one minute. Then fish it out with a chopstick or plastic utensil and wipe dry with a piece of soft cloth or kleenex. 


Looks brand new, doesn' it? Now this method of cleaning also works for other items made out of sterling silver such as wire baskets, silverware, and any other housewares made out of silver. 

What I love about this way of cleaning is that you can do it with items you readily have in your home. It doesn't require buying jewelry cleaners and other nonsense. Plus, this method won't damage the silver and it's super quick and easy! 

One last tip: in order to prevent your silver from tarnishing make sure to store it enclosed in a box when not in use. Oxygen is the enemy of silver! It's what causes silver to tarnish. 

12.14.2011

DIY HOLIDAY CARDS


This holiday season I got the urge to make my own cards. I used materials I had lying around and whipped up these cards in no time - a fast, instant gratification project.

Materials:
- Various felt fabric
- Yarn scraps
- Ribbon
- Blank cards
- Cardstock paper
- Glue

Tools:
- Fabric scissors
- Pen

Ornament Card

1. Draw ornaments shapes on cardstock paper with a pen. Cut out the shapes. Then place an ornament shape on a piece of felt fabric and trace around it with a pen. Cut the shape, preferably with fabric scissors for a clean, crisp edge.


2. Spread glue lightly on back of ornament shape and paste it on the front of a blank card.

3. Pour a thin line of glue from top centre of the ornament to the top of the card. Glue a piece of scrap yarn on it. Then cut off the excess at the top.


4. Make a little ribbon with a piece of scrap yarn. Then glue it at the top centre of ornament.


Christmas Tree Card

1. Cut a triangle from a piece of green felt fabric.

2. Cut three ribbon scraps and glue them on the diagonal on the tree. Allow to dry for 30 minutes. Then cut off the excess.


3. Cut out a little tree stump from a piece of felt fabric.

4. Spread glue lightly on the backs of the triangle and stump and glue on the front of a blank card.


Trio of Pennants Card

1. Cut out a rectangular strip  of felt fabric. Fold lengthwise. Draw a diagonal line from the point where the corners meet to a point on the folded edge about 1 cm in from the adjacent edge. Cut along the line. Repeat this step two times with other pieces of felt fabric.


2. Lightly spread glue on backs of pennants. And paste on the front of a blank card.


If you don't have felt fabric on hand, coloured paper would work just as well. I used felt because I've got heaps of it (it's one of my favourite materials to work with).

12.02.2011

REUPHOLSTERED CHAIRS

This past summer I worked on a dining room chair reupholstery job for my relatives. I love the contrast between the simple clean lines of the fabric and the graceful antique chair. Having contrasts is one of the best ways to liven up a space. If everything is too matchy-matchy and coordinates seamlessly, then the room looks flat and sterile, i.e. booooring.


Upholstering the seat of a dining chair is the easiest type of upholstery that one can DIY. This is my favourite Youtube video on how to re-upholster a chair. There are also a countless number of tutorials out there. I read a few to figure out the best technique.

The obligatory before and after picture.

Dining room chairs

I'm a nut for stripe patterns. If I allowed myself, I'd have striped everything.

We acuired a teak lounge chair back in September. It was on sale at Sugar Barrel Antiques on Main St. so we snatched it up. Unfortunately, the cushions were friggin' ugly, and the fabric was worn through and ripped on parts of the the seat.

teak chair - before

I wasn't confident enough to take on the reupholstery project myself. So I paid someone a lot of money to do it for me. It took almost a month to get them back because they were super busy. Hence the reason why this blog post is long overdue.

vintage teak lounge chair

Unfortunately, I'm not quite happy with the results. It was the first time I ever had anything professionally upholstered so I didn't give specific directions. What I really wanted were boxy cushions, but of course, to my great irritation, the person couldn't simply read my mind. Anyway, I think in the future I may try to reupholster the cushions myself.


teak lounge armchair - after

It's a beautiful chair. I agonized over whether to get it or not. But it was such a good price that I couldn't pass it up. It's only going to go up in value because there's only so much midcentury modern furniture in the world and everyone wants a piece of the action it seems. SBA is a great source of MCM furniture and accessories in Vancouver. All their MCM stuff is in the basement, and I go weak in the knees looking at their vast collection every time I go.

We recently acquired a pair of vintage armchairs (from Attic Treasures on the The Drive), and I can't wait to show them off here. But first we need to get rid of the loveseat (the last piece of ugly furniture we own) before they can take their proper place. Our living room is an unholy mess right now.

9.02.2011

HACKING A SUNBURST MIRROR


Earlier in the summer I found a dusty old sunburst clock at an estate sale. I grabbed it so that I could transform it to the sunburst mirror I always wanted. It was the best $2 I ever spent at an estate sale.

Here's the original sunburst clock.


I couldn't wait to take off the ugly clock face. But when I dismantled it I ran into a couple problems.


Originally I thought I was going take off the hands of the clock and the little knob that holds them and simply glue a mirror on top of the clock face. But when I unscrewed the hands, the clock and the battery pack behind it all came loose as well. This called for a Plan B. How was I going to glue the mirror onto the space where the clock used to be? Additionally, how was I going to hang up this thing since the hook for hanging the clock was attached to the battery pack?


For the mirror solution, I first cut a few pieces of craft foam into circles. I ended up only needing to glue two of them together to fill in the space in the centre. 


For the hanging solution, I used some picture hanging wire I had on hand and tied it to the back like so.


Then I glued on top of the foam circles the mirror I hacked together using a 7 in. round mirror and a 7 in. wooden embroidery hoop that I painted gold. And voila!

sunburst mirror


It's everything I hoped it would be.

There are lots of instructions out there for how to make a sunburst mirror from scratch. This one and this one are two pretty good tutorials.

DIY sunburst mirror

This sunburst mirror has one little imperfection. Bonus points to the first one who can point it out. 

8.09.2011

PAINTING WITHOUT TAPE

The thing I hate the most about painting is the prep work. I absolutely hate taping the edges of a room. It's the painting I love to do. The Dude is the opposite. He doesn't mind taping, but he hates painting. How could you hate the most fun part?! So I make him do all the taping.

Anyway, I searched on youtube for painting without tape methods and found the "cutting a paint line" technique. I looked at several videos and turns out there are slight variations for this particular method. This was the one I liked the best:


I used this method to paint the bedroom, and it has revolutionized the way I paint. After a few tries, I got the hang of it. Vibrating the brush a bit while I cut a line seemed to work best for me. I also held my breath when I first began, but after a while I could cut a line while breathing normally.


Also, the secret to cutting a straight paint line is to use a damn good paintbrush that's angled. I splurged on a good one by Purdy that's 2 inches wide. And it's crucial to load the brush with the right amount of paint or you'll end up with a mess.

Using tape has it downsides: it's wasteful, it's a pain in the ass to put up and take down, and the paint usually bleeds through. Drawing a paint line by hand is a win-win...except for when you mess up. But paint is easy to clean up when it's wet. So just wipe off and start again.

3.11.2011


Very little has been accomplished in the way of home decorating because things have been so hectic lately. But I did manage to make a terrarium finally. They're still all the rage it seems.

Terrariums are super easy to make, especially when using succulents. Plus, they require very little care and maintenance. For the one above I just lined the bottom with some river rocks, then placed a layer of charcoal, and topped that with some cactus soil. Lastly, I inserted a jade plant, and voilĂ , a terrarium! So easy, so fast. So I wonder why it took me months to get to this project.

What's been keeping me busy lately is my new volunteer gig. Last month I agreed to become the editor of my church newsletter. My first issue comes out this weekend. It's been a fun project, but I'm glad I only have to put out four issues a year because it's time-consuming work.

And time is something I'm sorely lacking these days. I'm putting in more time into running my shop. It's been encouraging to see sales steadily grow. And I hope to expand the products I offer.

But running a business, I'm learning, results in working seven days a week. I realized recently that I don't have a single day off. Since I also have a part-time job at Granville Island, I end up working on the days I could potentially have off. So it's no surprise that I had a mini-breakdown last weekend due to sheer exhaustion. Somehow I need to figure out a way to carve out time off. But my workaholic self doesn't know how to relax. The only way I can do nothing is if I'm away from home and have no choice but to relax.

Starting tomorrow I'll have two weeks off to do anything but work as we'll be traveling down to Argentina and then up to Massachusetts visiting our families. I'm going to relish every minute that I get to relax and have fun.

2.11.2011

Remember the sad empty wall I was crying about?

Allow me to remind you:


The Dude and I finally got around to putting up the troublesome wall shelves. And voila!


Initially, we put up three vertical rails, but decided to take the middle one out. It was unnecessary. Plus, because the wall is not even, the shelves were not flush against the wall, and taking out the middle rail solved that problem. It's weird how walls can be uneven because they look deceptively straight to the naked eye. The cedar boards are just resting on the brackets. Don't want to bother attaching them together. Crossing my fingers that it won't be a problem.


If I had all the space my heart desired, this is not how I would curate the stuff on the shelves. But the shelves were mounted so that I'd have more space to store all the thrifted objects that I'm selling in the shop, and they don't necessarily mesh very well colour- and style-wise. Anyway, the items on display will be in constant rotation as things come and go so I'm not going to worry too much about it all looking pretty and shit. 

The shelves are holding a few personal items as well, one of which is the cat picture, a recent thrift shop find. It's a print from the "Sam" the cat series that Andy Warhol did, and I love it. The Dude thinks it looks weird, but I don't care.

More wall shelves are slated for the future, which means another trip to Home Depot(s). The plan is to fill the red wall with similar shelving. The landlord is sure going to have a lot of fun spackling all the holes we've drilled into the walls once we move out.